Guide#
For more in depth information click here.
Initial setup#
First thing you should do after installing git is set your username and email.
These are stored in a gitconfig file. There are multiple levels of configs, --global being for the entire system and --local only for that repository.
git config --global user.name "John Doe"
git config --global user.email "john@example.com"
git config --list
To get help for any command you can use
git <command> --help or git help <command>
Initialize a repository in an existing directory#
Make sure this is executed inside the directory. This creates a new subdirectory named .git that contains all of your necessary repository files.
Do not delete the .git folder!
git init
Making changes to a repository#
 After adding/deleting/modifying files, use
 git add <directory> or git add <file> to add the files to the queue to be committed.
git commit commits all the added files. To be more descriptive a commit messages can also be added with git commit -m “<message>” which is very important so that you know what was changed in that commit.
You can also use the following to make life easier:
- git add -A stages all changes
- git add . stages new files and modifications, without deletions
- git add -u stages modifications and deletions, without new files
To save even more time you can use git commit -a which is the same as executing git add -A followed by a git commit
To check the status of the files in your repository usegit status
To see the history of your commits you can use git log
Using a Remote Repository#
For collaboration with other people or as a backup it is useful to have your local repository linked to a remote repository, for example on a GitHub server.
It is easiest to start with a repository created on the GitHub server. Cloning this repository creates a new local repository that is linked to the remote one you cloned. To clone a repo use git clone https://github.com/LuciferUchiha/Digital-Garden.git
If you already have a local repository and want to add a remote repository you can do so the following way:
git remote add origin https://github.com/LuciferUchiha/remote-repo.git
git branch -M main
git push -u origin main
You can check the remote repository you are connected to with git remote -v.
Now you can edit and add files and commit your changes. Once you are done, you can push your changes with
git push
Before you continue working you should pull any changed you might have committed from another computer or that might have been committed by a collaborator:
git pull
Branching#
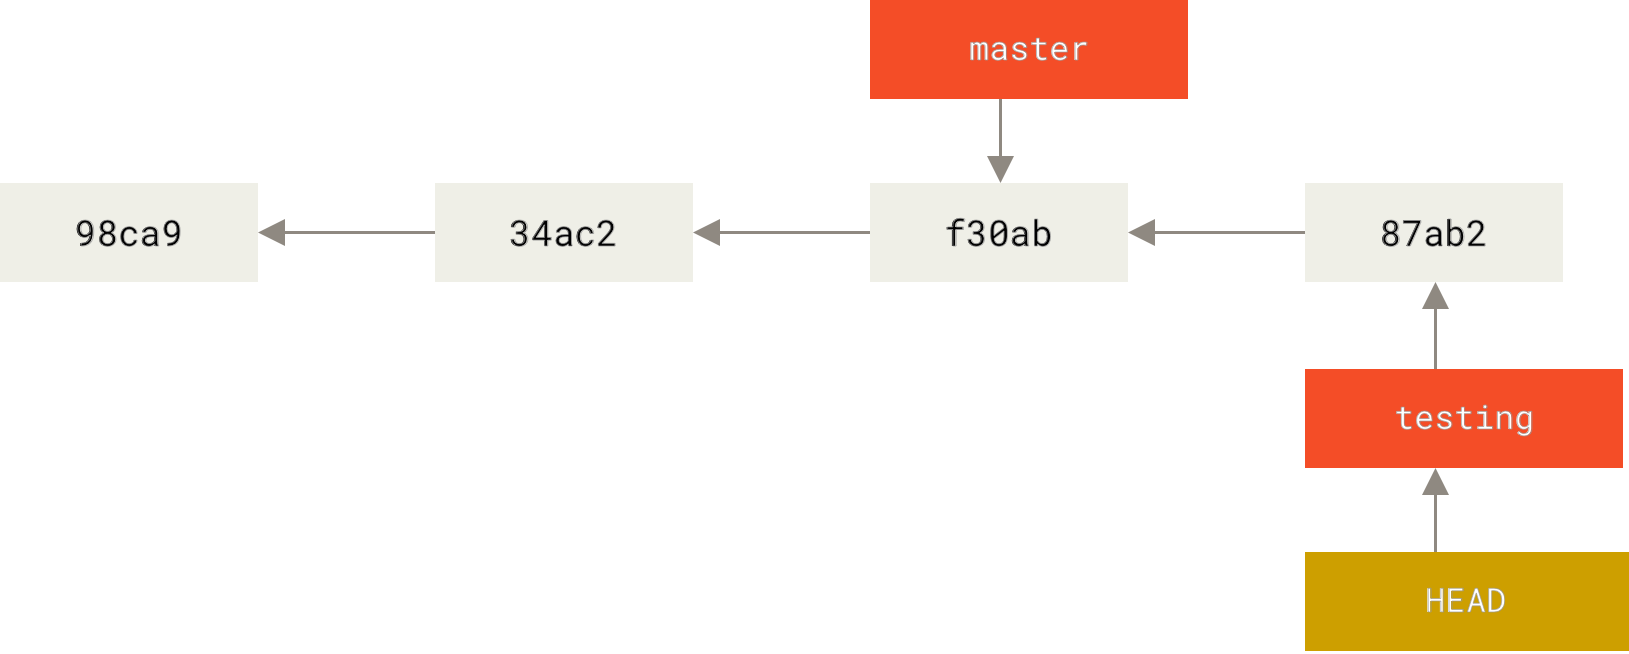
A branch in Git is simply a lightweight movable pointer to one of these commits. The default branch name in Git is master.
Every time you commit, the master branch pointer (HEAD)moves forward automatically.
To create a new branch use the command:
git branch testing
git branch command only created a new branch it didn’t switch to that branch.

To switch to an existing branch, you run the git checkout testing command.

After changing a file and commiting, our structure could look something like this
To create and checkout a new branch at the same time:
git checkout -b testing
To view all branches use git branch without any parameters. By adding -v you can also see the last commit on each branch. If you add --all you can also see the remote branches of a repository.
Merging#
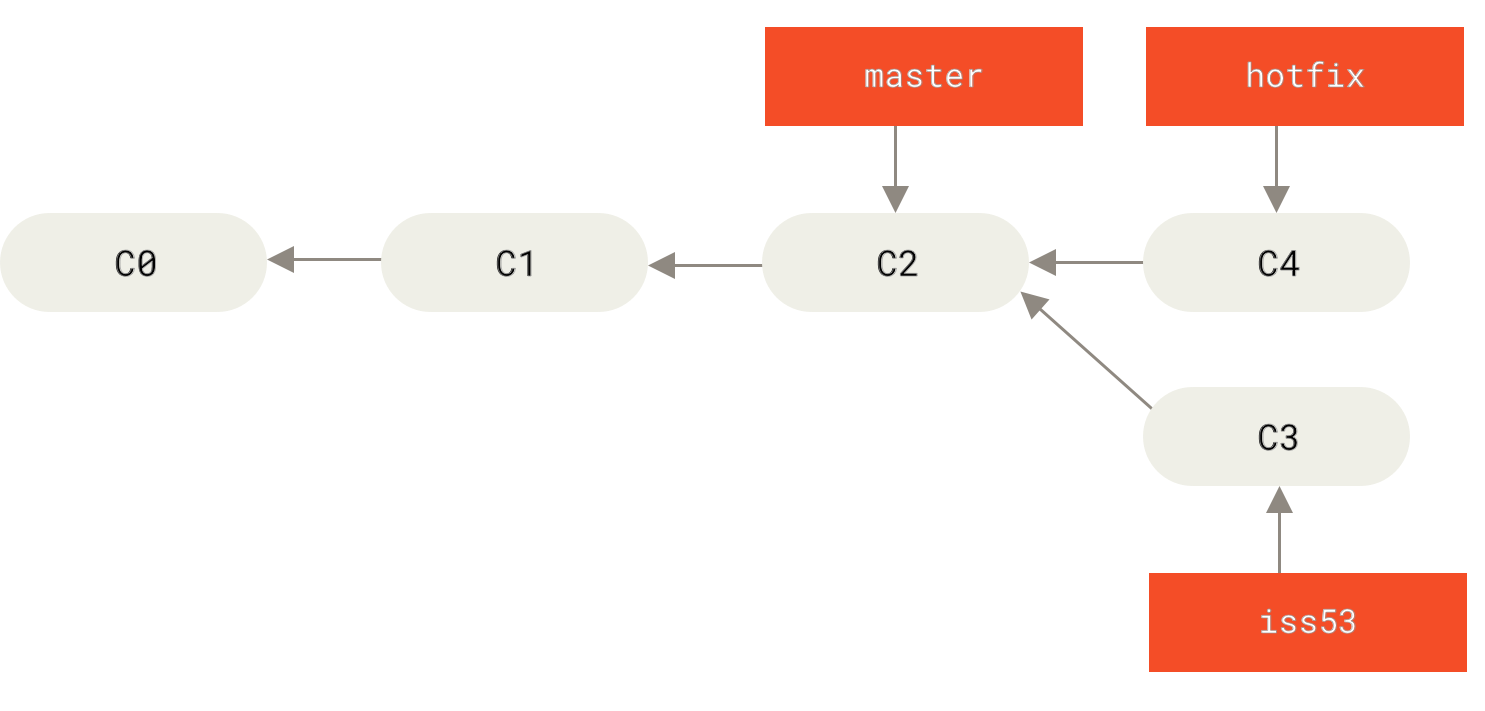
Assume our structure looks like the following
Fast-forward#
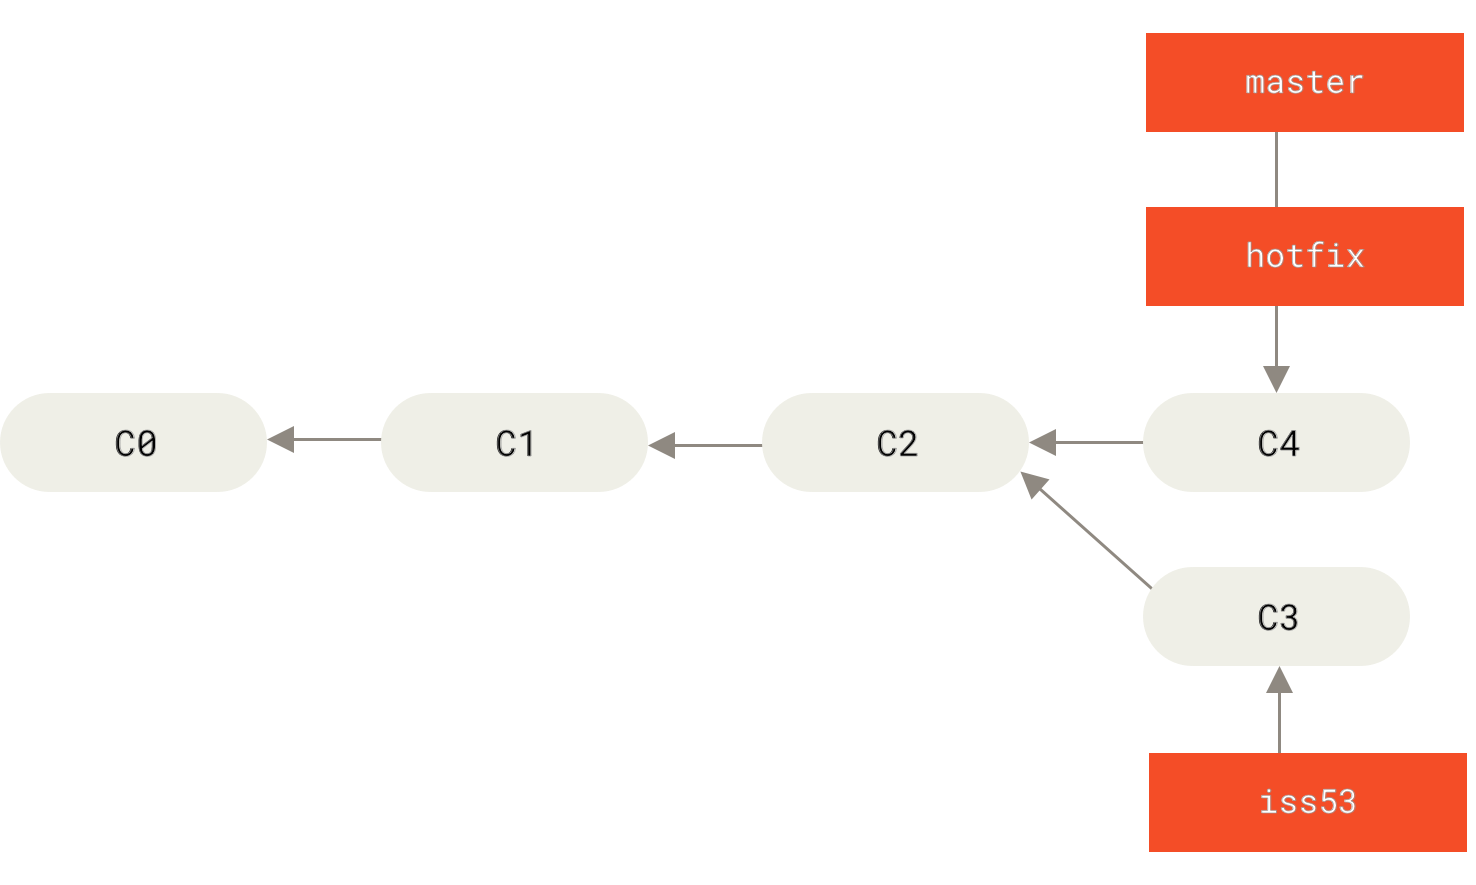
If we now execute the commands bellow, a so called fast-forward merge is done which basically moves the pointer of the master branch.
git checkout master
git merge hotfix
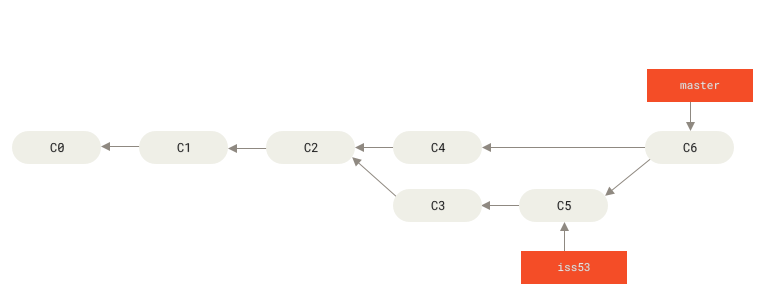
Three-way#
We can now delete the hotfix branch, checkout the issue branch and do some more work.
git branch -d hotfix
git checkout iss53
echo "lots of work" > index.html
git commit -a -m "Did lots of work"
iss53 into master.
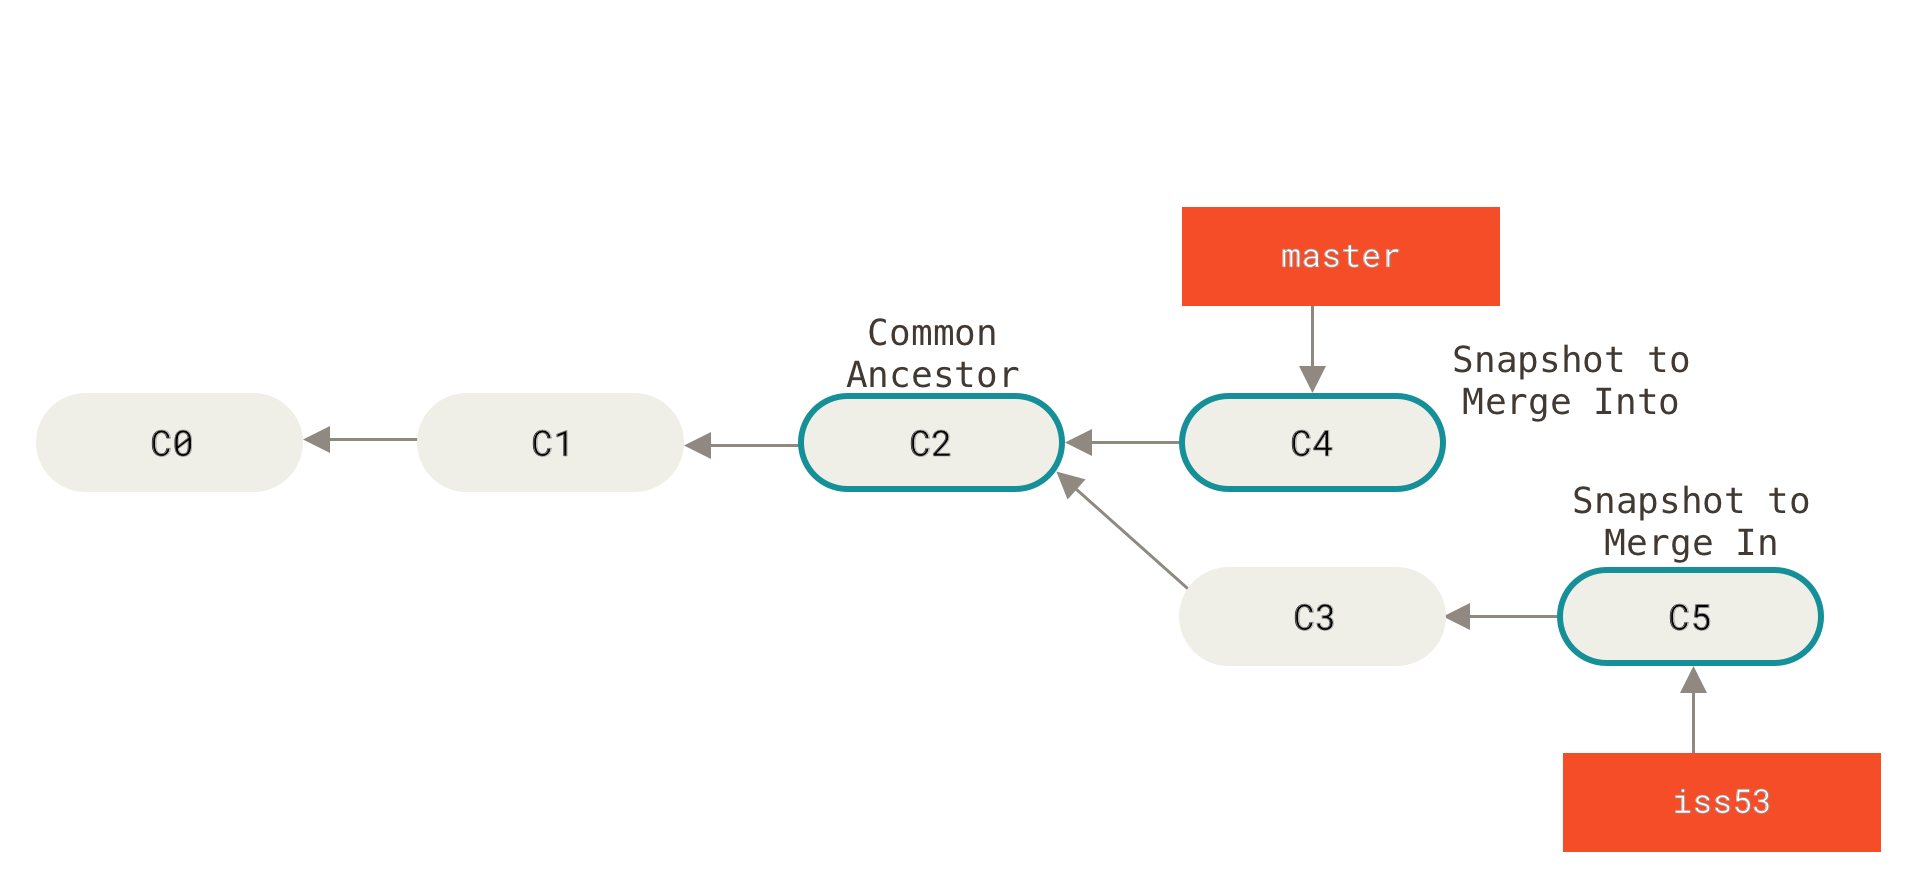
git checkout master
git merge iss53
Merge Conflicts#
On the rare occasion the process above doesn’t go smoothly. If you changed the same part of the same file differently in the two branches you’re merging, Git won’t be able to merge them. This is a so called merge conflict. With git status you can see in which files there are conflicts, they will be marked as unmerged.
If you open up such a file you will find something along the following:
<<<<<<< HEAD:index.html
<div id="footer">contact : email.support@github.com</div>
=======
<div id="footer">
 please contact us at support@github.com
</div>
>>>>>>> iss53:index.html
To resolve the merge conflict you need to choose one of the 2 versions you want or merge the code manually. This resolution has a little of each section, and the <, = and > lines have been completely removed. To finish it off use a git add on the resolved file.
<div id="footer">
please contact us at email.support@github.com
</div>